IOS measures the sensitivity of the image sensor. Higher ISO settings are generally used in darker situations to get faster shutter speeds. These images captured display the features that I have discussed.

The aperture that this picture was taken at was at F22 which is the highest aperture setting that allowed the least amount of light to pass through the lens and the shutter speed was set at a reading of 1/2000. This created a very low key picture, hence why it is hard to identify the object in the picture. I found it difficult at first to come to terms with how to adjust the aperture and shutter speed and was getting quite frustrated that i could not visually see the image clearly in the camera.

I have taken multiple pictures of an object and kept adjusting the aperture speed shutter so that the lighting kept changing. the reading on the camera was 1/320 shutter speed and 8.0 aperture which created a bright blurred picture of a tree. The image is slightly visible, however does not look ideal. The setting for all of four of these pictures were taken in the same location. They all looked different and had different effects because of the camera adjustments I had made from the aperture and shutter speed.

I finally learnt and managed how to control the aperture and f-stops and achieved a perfect picture of the object. I changed the shutter speed to 1/800 and the aperture to F13 which resulted in giving me a clear and beautiful image of a school playground. The picture is taken where everything is focused in a natural frame. These images illustrate the depth of field

This picture had a shadowy effect as some of the objects in the picture are shown up dark and unclear. The camera was set to a fast shutter speed 1/1250 and a small aperture setting F18 which allowed less light to pass through the lens. This created a dark image where the main focus is created on the sky and portrays a shadowy effect of the houses and trees.

I had set up my camera aimed towards the cloudy daylight sky trying to find the sun as I wanted to create a sunstar picture. The size of my aperture was small as i knew allowing too much light through with a larger aperture would not create the image i wanted to portray and would create a bleached image. The size of my aperture was set at F22 and the shutter speed at 1/2000. The lighting make my subject glow through the clouds which I thought was near enough a sunstar and was pretty satisfied with the outcome. It looks almost sacramental with the vivid glow it's surrounded by which is reflected on the clouds.
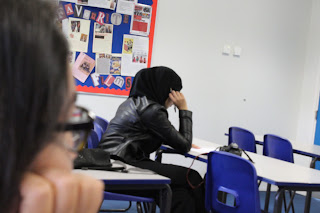
The camera has blurred out the closer subject and focused more more on the subject sitting down further away. This allows our focus to drift towards the person working in the classroom and this effect tells a story.
No comments:
Post a Comment